Hold review: Metolius Granite Macros, Hueco Macros, and Cobblestone Modulars

Continuing in a series, I'd like to
offer a quick review of a few Metolius holds I picked up recently,
since information on specific sets and holds in the Metolius line
seems hard to come by on the internet. The two sets I'd like to
review today are the Granite and Hueco macro sets, sold in packs of
two, and a 5-pack of Cobblestone Modulars. In-depth reviews follow; if you want to read the lowdown, skip to the end.
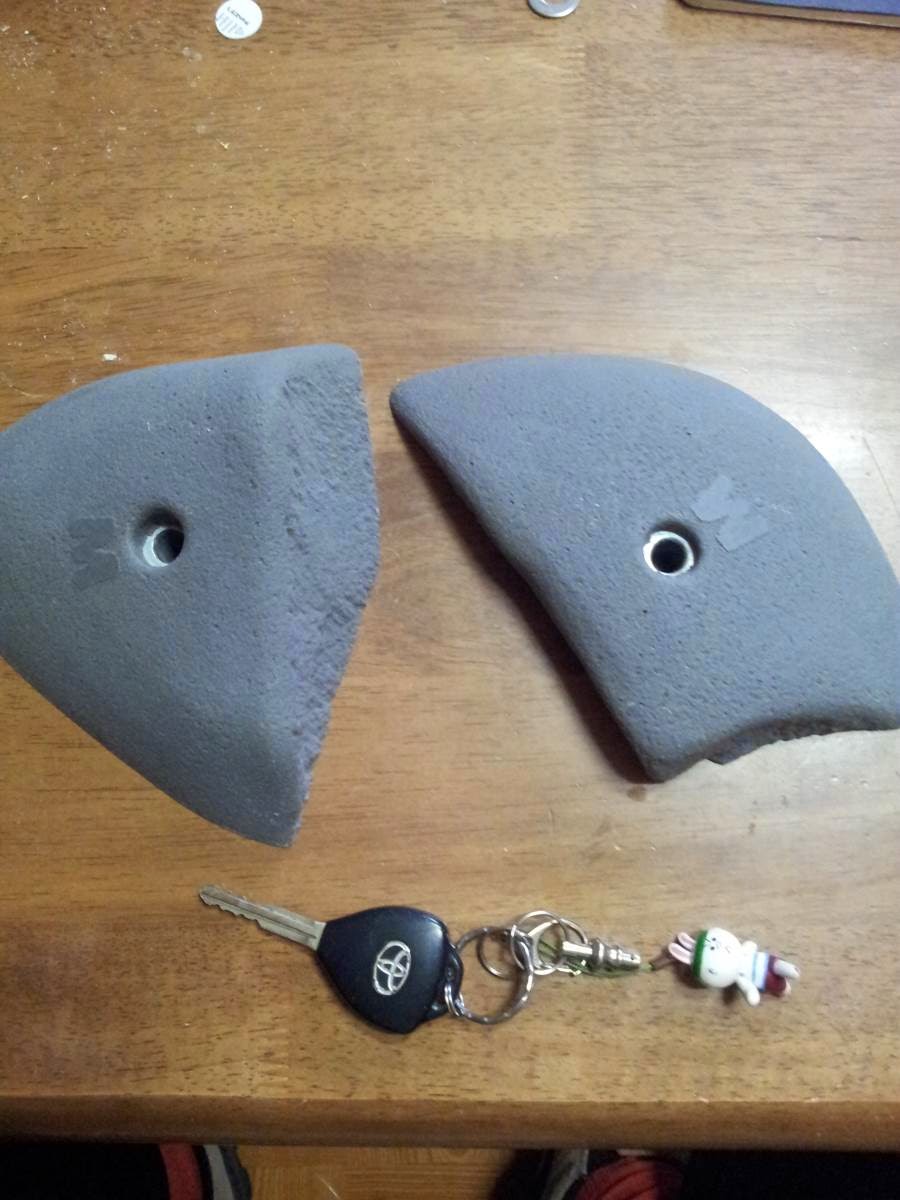
Hueco Macro 2-Pack (Set B)

Keys not for scale, I just happened to have them there
If those don't look interesting to you,
you must not spend as much time window-shopping holds on the internet
as I do (not a bad thing). These guys are big and heavy, and pack a
huge amount of detail into the interior of the hold. In nearly any
orientation, you'll find something to use, whether it be a narrow
pocket, incut crimp, deep pinch, or easy jug. The texture is good,
and a bit grittier than some Metolious holds I've tried; if you
wanted, you could even use the unfeatured part of the one on the left
as a sloper.

I circled it, in case you weren't sure which hold I was reviewing.
The larger of the two holds I placed on
my flat wall, arranged so the best part of the hold faces up. In my
recent competition, people seemed to prefer to use this as a pinchey
sidepull. The divots arranged along the bottom can be used as crimpy
pockets, but if you can reach the upper part of the hold I don't know
why you'd want to. Arranged with the jug side facing this right way,
this would be a solid hold even on quite steep ground.

This kind of pinch seems to be the best way to grab the hold straight-on, in this orientation
The second of the two was about as
juggy, and I put it right side up on the 40 degree overhand. This
provides a nice full-hand pocket that can be pinched for added power.
On a 40 degree incline the hold feels great from directly below, but
won't offer much traction as you get further out from the wall like a
jug would.

Maybe not quite full-hand
Flipped upside down, the underside of
the hold offers a fairly good crimp that would be slightly less than
positive on a slight incline and pretty bomber on a slab.

Both of these holds offer a wealth of
setting options on all levels of steepness, and I love using them.
You could probably even put them on a roof for a very tough pinching
challenge.
One thing I'd note is that although I haven't had any issues yet, these holds lack anti-spin screw holds, like all Metolius holds. The large backing area seems to help, though, and adding a screw in the pocket would be an easy fix. Certainly it doesn't seem like the same glaring lack as the Incut Edges ledges. Anyhow, moving right along to...
Granite Macro 2-Pack (set C)
I really need to find a good place to store my keys
Again, two big holds, but not quite as
featured or versatile as the Huecos above. The “outside” of these
holds feels quite smooth, while the “inside” has a nice roughened
texture... which still feels pretty smooth. These don't have the same
level of grit as the Huecos or the Cobblestones.

The larger of the two I put on the flat
wall (you can actually see the bottom of the Hueco above it). Aside
from tilting it slightly or trying to use it as the World's Worst
Sidepull, you're more or less stuck with a single orientation here.
The top of the hold is a fairly thin ledge that ranges from almost
neutral on the right side to quite negative on the left. The lip all
across is quite sloped and while it doesn't feel that difficult, it's no jug.

Of note for setting problems is that
this hold seems to look a lot better than it actually is. I've seen a
lot of people go for it and then recoil like it was a hot stove. In
the picture above I'm holding the best part of the hold- it looks
like there's a bit of a lip on the other side, but there really
isn't. I want to set a problem that forces a match on this guy, which
would really take some careful movement. I have it set quite low, too, which adds to the fun.

The second of the two offers two
useable edges, a neutral one and one that's just slightly positive on
my 40 degree incline. Both faces are much narrower than on the larger
hold, about a pad and a half to two pads deep.

The incut side is what I have up here,
and matching on feels pretty good. The incut side would be very good
on anything less steep and hard as hell on anything steeper. There's
more of a lip here than on the other hold, but just barely. On a
flat wall, the other side would offer a slopey crimp.
These two holds are certainly less
versatile than some, but work well if you want some slopey ledges. I
bought them to put on the flat wall, and put one on the 40 when it
turned out to be more positive than I expected. Like the Huecos above, I haven't had any issues with spinning on them yet.
Cobblestone Modulars 5-Pack (Set C)

Honk if you love slopers! Like the Granite pieces above, I bought these in preparation for the building of my flat section, and they turned out great. Metolius's Cobblestone line consists of all sizes of flat slopers. This set ranges from the big and fat (lower right) to the nearly non-existant (bottom). Although these holds are simple, they feature a great gritty texture and versatile design.

The centerpiece of this set, for me, is the fatty shown above (lower right in the top picture). This sloper bulges out at the top just enough to be very slightly positive on my 30 degree wall, which is where it lives now. As you can see by the chalk, it gets a lot of use, lending itself well to interesting problems and being a perfect level of difficulty for me at this steepness. On anything up to about 15 degrees, this would be an easy sloper for a beginner. Past that it gets harder; I can match and move past it with careful footwork and slow moves, and a stronger climber could incorporate it into more dynamic moves. On anything steeper than this, I think it would get pretty difficult to use, being too fat to effectively pinch.

The rest of the set is much smaller, and I have them on the flats. All are quite similar, with one side of the hold offering a slightly more positive surface. All of them are small enough to act as pinches.

How good the holds are at sub-optimal angles depends on the hold- some are fat enough to be decent even when hanging out, and some can only be used from directly below.

The flattest of the holds I haven't found a home for yet- I'm waiting to put it on a volume or possibly the arete, the only places I think it would be worth using. It's incredibly shallow.

Oh yeah, I did put another one on the 30, but it's awful. A stronger climber could probably use it- this is the most positive hold after the big one, but it's still negative on a 30.
On a final note, I have had some problems with spinning on the big sloper. The hold is fat and positive enough to invite lean-outs and compression moves, but these can cause it to spin; the bolt hole is slightly below center, so if the sides of the positive area are grasped and pulled left or right, it can spin. Like all Metolius holds, a screw hole would be very welcome here, especially since the shape of the hold makes perimeter screws difficult.
The Lowdown:
Hueco Macros: Versatile and fun to set with. Good for vertical to steeply overhung, probably tough on a roof.
Granite Macros: Good sloper ledge and a thin crimp ledge. Not very versatile. Great on vertical, smaller of the two usable up to 45 or so.
Cobblestone Modulars: Great slopers, good texture. Great on vertical to slightly overhanging, with one big hold that can go a bit steeper.
Thanks for reading!
Cobblestone Modulars 5-Pack (Set C)
Honk if you love slopers! Like the Granite pieces above, I bought these in preparation for the building of my flat section, and they turned out great. Metolius's Cobblestone line consists of all sizes of flat slopers. This set ranges from the big and fat (lower right) to the nearly non-existant (bottom). Although these holds are simple, they feature a great gritty texture and versatile design.
The centerpiece of this set, for me, is the fatty shown above (lower right in the top picture). This sloper bulges out at the top just enough to be very slightly positive on my 30 degree wall, which is where it lives now. As you can see by the chalk, it gets a lot of use, lending itself well to interesting problems and being a perfect level of difficulty for me at this steepness. On anything up to about 15 degrees, this would be an easy sloper for a beginner. Past that it gets harder; I can match and move past it with careful footwork and slow moves, and a stronger climber could incorporate it into more dynamic moves. On anything steeper than this, I think it would get pretty difficult to use, being too fat to effectively pinch.
Two hands will fit, barely
The rest of the set is much smaller, and I have them on the flats. All are quite similar, with one side of the hold offering a slightly more positive surface. All of them are small enough to act as pinches.
How good the holds are at sub-optimal angles depends on the hold- some are fat enough to be decent even when hanging out, and some can only be used from directly below.
The flattest of the holds I haven't found a home for yet- I'm waiting to put it on a volume or possibly the arete, the only places I think it would be worth using. It's incredibly shallow.
Oh yeah, I did put another one on the 30, but it's awful. A stronger climber could probably use it- this is the most positive hold after the big one, but it's still negative on a 30.
On a final note, I have had some problems with spinning on the big sloper. The hold is fat and positive enough to invite lean-outs and compression moves, but these can cause it to spin; the bolt hole is slightly below center, so if the sides of the positive area are grasped and pulled left or right, it can spin. Like all Metolius holds, a screw hole would be very welcome here, especially since the shape of the hold makes perimeter screws difficult.
The Lowdown:
Hueco Macros: Versatile and fun to set with. Good for vertical to steeply overhung, probably tough on a roof.
Granite Macros: Good sloper ledge and a thin crimp ledge. Not very versatile. Great on vertical, smaller of the two usable up to 45 or so.
Cobblestone Modulars: Great slopers, good texture. Great on vertical to slightly overhanging, with one big hold that can go a bit steeper.
Thanks for reading!

.jpg)
.jpg)


